running 9front on arm mac in qemu
By byte
Table of Contents
- getting started
- qemu setup
- actual installation
- boot partition hurdle
- booting with network and getting to GUI
- next steps
getting started
this guide assumes the reader is familiar with what plan9's deal is, basic features of qemu, and has unhealthy attraction to obscure software like the author does. also some arm mac hardware.
x64
if the latter isn't the case but everything else is still true then good news! 9front can be installed just by following the guide, x86_64 is quite simple and the semi-auto installer takes care of everything properly. i went through it many times both on qemu and real hardware like thickpad T60. here's a video that can guide you through it.
arm64
now for the rest of the audience:
first go to this peculiar corner of the internet, grab the latest stuff:
- https://9front.org/releases/2026/08/02/0/, specifically the arm qemu image
- and a pdf manual for it
after it’s all downloaded i highly recommend skimming through the whole manual, it’s quite entertaining and will be enough for a quick basic introduction.
qemu setup
get brew (if needed), follow prompt to add it into zshprofile and the current console session
/bin/bash -c "$(curl -fsSL https://raw.githubusercontent.com/Homebrew/install/HEAD/install.sh)"then qemu:
brew install qemu
qemu-system-aarch64 --version
prepare the disk:
IMG=9front.arm64.qcow2
gunzip -c 9front-11952.arm64.qcow2.gz > "$IMG"
the manual says 9front on arm needs a u-boot as a bootloader, and that it needs to be built from sources. on arm mac this would require a troublesome setup with gnu tools for cross-compilation, some kind of build container and an emulation of x64 through rosetta. that’s hella annoying.
instead, let’s just use the binary provided by the lesbian linux:
mkdir -p .tmp/ && cd .tmp/
# fetch it
UBOOT_DEB=u-boot-qemu_2025.01-3+deb13u1_all.deb
UBOOT_DEB_URL=https://deb.debian.org/debian/pool/main/u/u-boot/$UBOOT_DEB
curl -fsSLO "$UBOOT_DEB_URL"
ar x "$UBOOT_DEB"
tar xf data.tar.xz
# get the binary and cleanup
mv ./usr/lib/u-boot/qemu_arm64/u-boot.bin ../
cd ../
rm -rf .tmp
now we can try the initial boot with the parameters more or less close to the ones recommended by the manual:
qemu-system-aarch64 \
  -M "virt-11.0,gic-version=3,highmem-ecam=off,accel=hvf" \
  -cpu host -m 4G -smp 4 \
  -bios u-boot.bin \
  -drive "file=$IMG,if=none,id=installer" \
  -device virtio-blk-pci-non-transitional,drive=installer
  -display none -serial stdio
expected output is:
## Transferring control to Plan 9 (at address 40100000) ...
127 holes free
0x40523000 0x7ffff000 1068351488
1068351488 bytes free

Plan 9
timer frequency 24000000 Hz
cpu0: 1000MHz QEMU
4095M memory: 1023M kernel data, 3072M user, 15344M swap
cpu1: 1000MHz QEMU
cpu2: 1000MHz QEMU
cpu3: 1000MHz QEMU
qemu.bootfs: Thu Jul 30 07:19:08 GMT 2026
fingerprint: e6b8428c2f58f159a7ddfe8c9cae52a29ca841a9
nusb/usbd: no hubs

/dev/sdF0:
/dev/sdF0/data
/dev/sdF0/dos	 dos
/dev/sdF0/fs	 hjfs
/dev/sdF0/nvram
/dev/sdF0/plan9
bootargs is (tcp, tls, il, local!device)[local!/dev/sdF0/fs]
here we can just proceed with the guide, press enter a couple of times with the default prompts, and get to the shell:
bootargs is (tcp, tls, il, local!device)[local!/dev/sdF0/fs]
user[glenda]:
hjfs: fs is /dev/sdF0/fs

init: starting /bin/rc
...
% ls
bin
lib
tmp
but it’s just the "livecd", not the real install. let’s fix that by killing the VM and restarting with a user disk image. in the guest shell:
% fshalt

halting.../srv/hjfs.cmd...hjfs: ending

done halting
aux/acpi: unknown device in # filename
It's now safe to turn off your computer
^C
qemu-system-aarch64: terminating on signal 2 from pid 658 (<unknown process>)
now in the host shell:
DISK=9front.qcow2
qemu-img create -f qcow2 "$DISK" 64G

# and restart the VM
qemu-system-aarch64 \
  -M "virt-11.0,gic-version=3,highmem-ecam=off,accel=hvf" \
  -cpu host -m 4G -smp 4 \
  -bios u-boot.bin \
  -drive "file=$IMG,if=none,id=installer" \
  -device virtio-blk-pci-non-transitional,drive=installer
  -display none -serial stdio \
  -drive "file=$DISK,if=none,id=disk" \
  -device virtio-blk-pci-non-transitional,drive=disk
actual installation
now we can just follow «FQA 4.3 − Performing a simple install» section. mostly. by default cwfs64x setup skipped disk partition for me for some reason, so mountfs fails.
% inst/start
Thu Aug 20 22:08:00 CET 2026 Installation process started

Preparing menu...
The following unfinished tasks are ready to be done:
	configfs	- choose the type of file system to install
	confignet	- configure the network
	tzsetup	- choose time zone

Task to do [configfs]:

--------------------------------------
You can install the following types of file systems:

	cwfs64x	cached-worm file server for large disks
	hjfs	file server for small disks
	gefs	good enough file system (experimental!)

File system (cwfs64x, hjfs, gefs)[cwfs64x]:

--------------------------------------

...
The following unfinished tasks are ready to be done:
	mountfs	- choose and mount file system partition
	confignet	- configure the network
	tzsetup	- choose time zone

Task to do [mountfs]:

--------------------------------------

Please choose your cwfs64x partitions

Cwfs cache partition [no default]:
so instead of just falling through let’s choose the skipped steps and approve the defaults.
it looks scary but in reality it’s just typing out a couple of words and pressing enter.
Preparing menu...
The following tasks are done:
	configfs	- choose the type of file system to install
	partdisk	- edit partition tables (e.g., to create a plan 9 partition)
	prepdisk	- subdivide plan 9 disk partition

The following unfinished tasks are ready to be done:
	mountfs	- choose and mount file system partition
	confignet	- configure the network
	tzsetup	- choose time zone

Task to do [mountfs]: partdisk

--------------------------------------
The following disk devices were found.

sdF0 -
   empty                 0 1          (1 cylinders, 3.93 MB)
 * p1                    1 25         (24 cylinders, 94.50 MB) FAT32
   p2                   25 957        (932 cylinders, 3.58 GB) PLAN9

sdG0 -

Disk to partition (sdF0, sdG0)[no default]: sdG0
The disk you selected HAS NO master boot record on its first sector.
(Perhaps it is a completely blank disk.)
Shall we create a blank EFI partition table (GPT)
or install traditional DOS partition table (MBR)?

Install mbr or gpt (mbr, gpt)[no default]: mbr

This is disk/fdisk; use it to create a Plan 9 partition.
If there is enough room, a Plan 9 partition will be
suggested; you can probably just type 'w' and then 'q'.

cylinder = 8225280 bytes
'* p1                     0 8354        (8354 cylinders, 63.99 GB) PLAN9
>>> w
>>> q

--------------------------------------

Preparing menu...
The following tasks are done:
	configfs	- choose the type of file system to install
	partdisk	- edit partition tables (e.g., to create a plan 9 partition)
	prepdisk	- subdivide plan 9 disk partition

The following unfinished tasks are ready to be done:
	mountfs	- choose and mount file system partition
	confignet	- configure the network
	tzsetup	- choose time zone

Task to do [mountfs]: prepdisk

--------------------------------------
The following Plan 9 disk partitions were found.

/dev/sdF0/plan9
  empty                 0 2          (2 sectors, 1.00 KB)
  nvram                 2 3          (1 sectors, 512 B )
  fs                    3 7515647    (7515644 sectors, 3.58 GB)
  empty           7515647 7515648    (1 sectors, 512 B )

/dev/sdG0/plan9
  empty                  0 134206947   (134206947 sectors, 63.99 GB)

Plan 9 partition to subdivide (/dev/sdF0/plan9, /dev/sdG0/plan9)[no default]: /dev/sdG0/plan9
This is disk/prep; use it to subdivide the Plan 9 partition.
If it is not yet subdivided, a sensible layout will be suggested;
you can probably just type 'w' and then 'q'.

no plan9 partition table found
9fat 204800
nvram 1
other 19143163
fscache 19143163
fsworm 95715820
' 9fat                   0 204800      (204800 sectors, 100.00 MB)
' nvram             204800 204801      (1 sectors, 512 B )
' other             204801 19347964    (19143163 sectors, 9.12 GB)
' fscache         19347964 38491127    (19143163 sectors, 9.12 GB)
' fsworm          38491127 134206947   (95715820 sectors, 45.64 GB)
>>> w
>>> q

--------------------------------------

Preparing menu...
The following tasks are done:
	configfs	- choose the type of file system to install
	partdisk	- edit partition tables (e.g., to create a plan 9 partition)
	prepdisk	- subdivide plan 9 disk partition

The following unfinished tasks are ready to be done:
	mountfs	- choose and mount file system partition
	confignet	- configure the network
	tzsetup	- choose time zone

Task to do [mountfs]:

--------------------------------------

Please choose your cwfs64x partitions

--rw-r----- S 0 glenda glenda 9801299456 Jul 30 09:19 /dev/sdG0/fscache

Cwfs cache partition (/dev/sdG0/fscache)[/dev/sdG0/fscache]:
--rw-r----- S 0 glenda glenda 49006499840 Jul 30 09:19 /dev/sdG0/fsworm

Cwfs worm partition (/dev/sdG0/fsworm)[/dev/sdG0/fsworm]:
--rw-r----- S 0 glenda glenda 9801299456 Jul 30 09:19 /dev/sdG0/other

Cwfs other partition (/dev/sdG0/other)[/dev/sdG0/other]:
Ream the filesystem? (yes, no)[yes]:
...
% mount -c /srv/cwfs.newfs /n/other other
the next step is configuring the network which we don’t actually need since we didn’t start the VM with network device and we have all the dist files in the installation image:
...
The following unfinished tasks are ready to be done:
	confignet	- configure the network
	mountdist	- locate and mount the distribution
	tzsetup	- choose time zone

Task to do [confignet]:

--------------------------------------

We will configure the ethernet.


Please choose a method for configuring your ethernet connection.

	manual - specify IP address, network mask, gateway IP address
	automatic - use DHCP and SLAAC to automatically configure

Configuration method (manual, automatic)[automatic]:
starting ethernet automatic config
now choose the distribution mount (/) and the OS files will be copied to the disk:
…
Task to do [mountdist]:

--------------------------------------
Please wait... Scanning storage devices...
	/dev/sdF0/data
	/dev/sdF0/dos
	/dev/sdF0/fs
	/dev/sdG0/9fat
	/dev/sdG0/data
	/dev/sdG0/fscache
	/dev/sdG0/fsworm
	/dev/sdG0/other

The following storage media were detected.
Choose the one containing the distribution.

	/dev/sdF0/dos (microsoft fat)

Distribution disk (/dev/sdF0/dos, /dev/sdG0/fscache, /)[no default]: /
% mount /srv/boot /n/distmedia

Which directory contains the distribution?

Location of archives [/]:

…
The following unfinished tasks are ready to be done:
	copydist	- copy the distribution into the file system
	tzsetup	- choose time zone

Task to do [copydist]:

--------------------------------------
processing /sys/lib/sysconfig/proto/allproto
file system made

--------------------------------------
next steps are trivial, just pressing enter some more:
…
Task to do [ndbsetup]:

--------------------------------------

Setup network configuration

sysname [cirno]:
…
The following unfinished tasks are ready to be done:
	tzsetup	- choose time zone
	bootsetup	- configure hard disk to boot plan 9

Task to do [tzsetup]:

--------------------------------------

Setup Time Zone

Time Zone (Argentina, Asia_Bahrain, Asia_India, Asia_Jakarta, Asia_Jayapura, Asia_Makassar, Asia_Pontianak, Australia_ACT, Australia_Broken-Hill, Australia_LHI, Australia_NSW, Australia_North, Australia_Queensland, Australia_South, Australia_Sturt, Australia_Tasmania, Australia_Victoria, Australia_West, Australia_Yancowinna, Brazil_Acre, Brazil_DeNoronha, Brazil_East, Brazil_West, CET, Canada_Atlantic, Canada_Central, Canada_East-Saskatchewan, Canada_Eastern, Canada_Mountain, Canada_Newfoundland, Canada_Pacific, Canada_Yukon, Chile_Continental, Chile_EasterIsland, Cuba, EET, Egypt, GB-Eire, GMT, HST, Hongkong, Iceland, Iran, Israel, Jamaica, Japan, Libya, Mexico_BajaNorte, Mexico_BajaSur, Mexico_General, NZ, NZ_CHAT, Navajo, PRC, Poland, ROC, ROK, Singapore, Turkey, US_Alaska, US_Arizona, US_Central, US_East-Indiana, US_Eastern, US_Hawaii, US_Michigan, US_Mountain, US_Pacific, US_Yukon, Uruguay, W-SU, WET)[US_Eastern]: CET
finishing up and making the user installation boot:
The following unfinished tasks are ready to be done:
	bootsetup	- configure hard disk to boot plan 9

Task to do [bootsetup]:
…
If you use the Windows NT/2000/XP master boot record
or a master boot record from a Unix clone (e.g., LILO or
FreeBSD bootmgr), it is probably safe to continue using
that boot record rather than install the Plan 9 boot record.

Install the Plan 9 master boot record (yes, no)[no default]: yes
Mark the Plan 9 partition active (yes, no)[no default]: yes

The Plan 9 partition is now marked as active.

--------------------------------------
…
Task to do [finish]:

--------------------------------------
Congratulations; you've completed the install.


halting...hjfs: ending
/srv/cwfs.newfs.cmd...halted at Thu Aug 20 22:34:01 2026.
/srv/hjfs.cmd...
done halting
rebooting...
cpu0: exiting
cpu1: exiting
cpu3: exiting
cpu2: exiting


U-Boot 2025.01-3+deb13u1 (Jun 24 2026 - 09:07:15 +0000)
….
bootargs is (tcp, tls, il, local!device)[local!/dev/sdF0/fs]
it prompts to boot from the installation image again after the reboot, so let’s choose the disk with the system we just installed (on sdG0):
/dev/sdF0:
/dev/sdF0/data
/dev/sdF0/dos	 dos
/dev/sdF0/fs	 hjfs
/dev/sdF0/nvram
/dev/sdF0/plan9
/dev/sdG0:
/dev/sdG0/9fat	 dos
/dev/sdG0/data
/dev/sdG0/fscache	 cwfs64x
/dev/sdG0/fsworm
/dev/sdG0/nvram
/dev/sdG0/other
/dev/sdG0/plan9
bootargs is (tcp, tls, il, local!device)[local!/dev/sdF0/fs] local!/dev/sdG0/fscache
user[glenda]:
current fs is "main"
…
init: starting /bin/rc
% ls
acme.dump
bin
lib
tmp
all successful! more or less.
boot partition hurdle
unfortunately i couldn’t make it boot without the installation image as u-boot fails to find the FAT boot partition we made during [bootsetup] step. 9front makes that «9fat» partition that should theoretically work, but it doesn’t:
% qemu-system-aarch64 \
  -M virt-11.0,gic-version=3,highmem-ecam=off,accel=hvf \
  -cpu host -m 4G -smp 4 -bios u-boot.bin \
  -drive file=9front.qcow2,if=none,id=disk \
  -device virtio-blk-pci-non-transitional,drive=disk \
  -display none -serial stdio

U-Boot 2025.01-3+deb13u1 (Jun 24 2026 - 09:07:15 +0000)

DRAM:  4 GiB
Core:  51 devices, 14 uclasses, devicetree: board
Flash: 64 MiB
Loading Environment from Flash... *** Warning - bad CRC, using default environment

In:    serial,usbkbd
Out:   serial,vidconsole
Err:   serial,vidconsole
No USB controllers found
Net:   eth0: virtio-net#32

starting USB...
No USB controllers found
Hit any key to stop autoboot:  0
Scanning for bootflows in all bootdevs
Seq  Method       State   Uclass    Part  Name                      Filename
---  -----------  ------  --------  ----  ------------------------  ----------------
Scanning global bootmeth 'efi_mgr':
Cannot persist EFI variables without system partition
Missing TPMv2 device for EFI_TCG_PROTOCOL
Missing RNG device for EFI_RNG_PROTOCOL
  0  efi_mgr      ready   (none)       0  <NULL>
** Booting bootflow '<NULL>' with efi_mgr
Loading Boot0000 'virtio 0' failed
EFI boot manager: Cannot load any image
Boot failed (err=-14)
probably there could be a way to fix it by prepending a FAT partition to the system disk and reproducing what the installation’s «/dev/sdF0/dos» contains but it’s too challenging for me rn. maybe someone who actually knows what they’re doing and has more experience can do that or fix the installer itself.
i choose to just keep booting with both the installer disk and system disk then choosing the system disk on boot xD
booting with network and getting to GUI
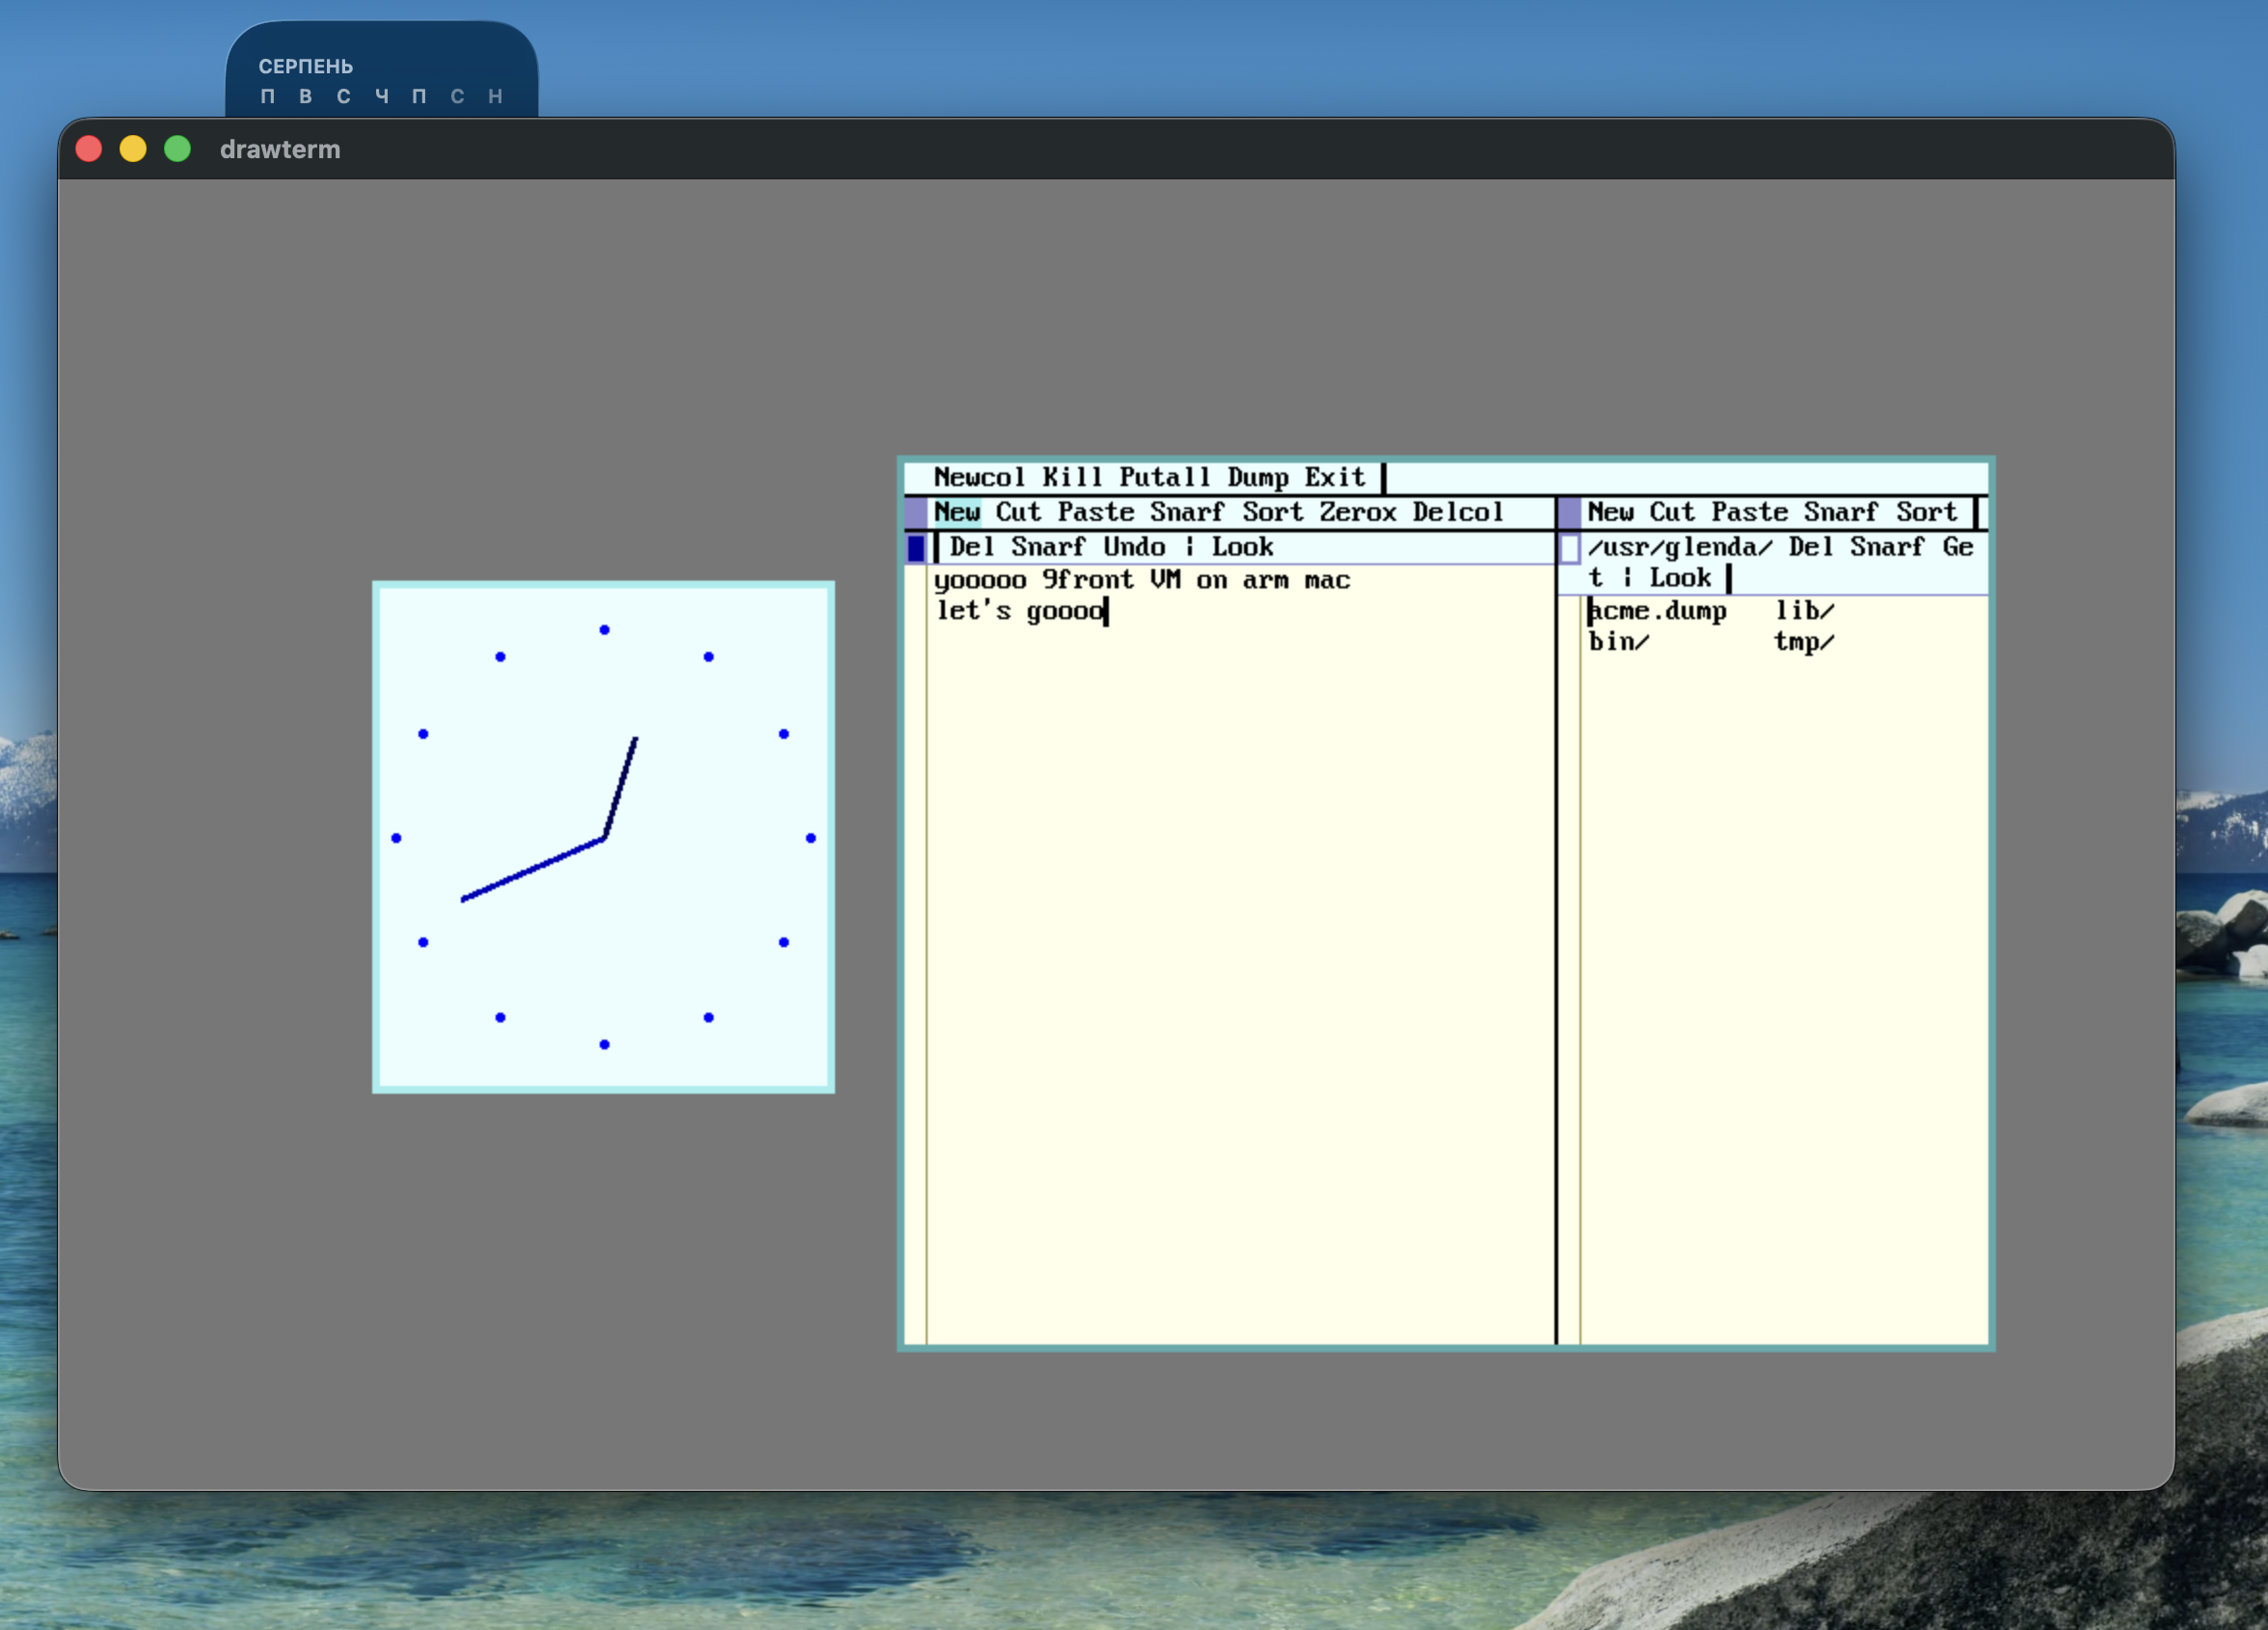
arm 9front doesn’t have graphics, but luckily we don’t need them where we’re going! instead we’ll use the amazing feature of the OS - native remote desktop. kind of. it’s not really a remote desktop in a way we understand the term now, more like a graphical terminal. anyway:
# get drawterm sources
git clone git://git.9front.org/plan9front/drawterm
cd drawterm
CONF=osx-cocoa make -j10
now we need the OS to accept the connections. let’s add network device and forward the port that drawterm uses:
qemu-system-aarch64 \
  -M virt-11.0,gic-version=3,highmem-ecam=off,accel=hvf \
  -cpu host -m 4G -smp 4 -bios u-boot.bin \
  -drive file=9front.arm64.qcow2,if=none,id=boot \
  -device virtio-blk-pci-non-transitional,drive=boot,bootindex=0 \
  -drive file=9front.qcow2,if=none,id=disk \
  -device virtio-blk-pci-non-transitional,drive=disk \
  -display none -serial stdio \
  -netdev user,id=net0,hostfwd=tcp::17019-:17019 \
  -device "virtio-net-pci-non-transitional,netdev=net0"
then once booted:
% # start the network
% ip/ipconfig
% # set auth params
% echo 'key proto=dp9ik dom=9front user=glenda !password=pass' > /mnt/factotum/ctl
% # start listener socket
% aux/listen1 -t 'tcp!*!rcpu' /rc/bin/service/tcp17019 &
% listen started
and on the host:
# enter «pass» when prompted
./drawterm -h localhost -a localhost -u glenda -x1
you'll be greeted with rc shell, the same that we had in qemu serial. to get to actual gui type in:
cpu % riothis will give you the original 9front experience and now you can familiarize yourself with 9p protocol and mouse chording, and never look the same at the "modern" systems and their backwards ways. have fun exporing xD
next steps
what i can't recommend enough is going through adventuresin9 channel on youtube. that dude has an amazing set of videos that can help anyone getting into the system quickly. especially: